with thanks to Brooke Hill
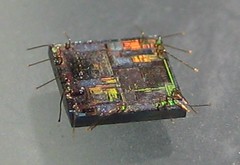
The following are instructions and matching photos for removing the packaging of microchips without a proper chemical laboratory. Neither a hot plate nor a fume hood is required, and the only chemicals necessary are fuming nitric acid and acetone. The result is a bare die, with bonding wires. The bonding wires may then be removed and the die photographed using microscope.
The same as any author of a lay chemistry article, I must caution you to be very careful with the procedure that I describe. If you've no prior experience with chemistry, purchase an introductory book and study the safety instructions thoroughly. Nitric acid in these concentrations is nasty stuff, even when cold.
Materials
You will need two small vials with wax-paper seals, high-purity HNO3, acetone, tweezers, and a few pipettes. A fume hood is not required, as the reaction will be performed at room temperature. Safety glasses are recommended.
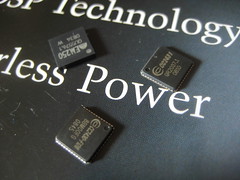
Surface mount chips are preferred for this method, as they have considerably less packaging to dissolve. I chose the CC2430, CC2431, and EM250 chips because they were handy, but also because I don't yet have die photographs of them.
Procedure
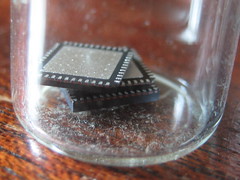
Begin by dropping the chips to be decapped into a vial.
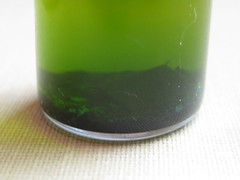
Then add nitric acid to cover the chips, plus a bit more. This will react slowly, rather than violently, but for safety's sake be damned sure never to look down any sort of glassware when mixing in a new reactant. You will see the reaction as small bubbles that come from the chip casing as it dissolves.
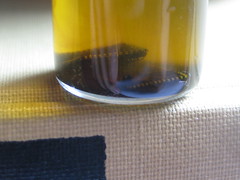
This will slowly turn the nitric acid from yellow to a dark green. Agitate it occasionally to ensure that all of the plastic gets a chance to break away.
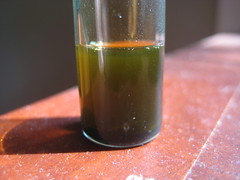
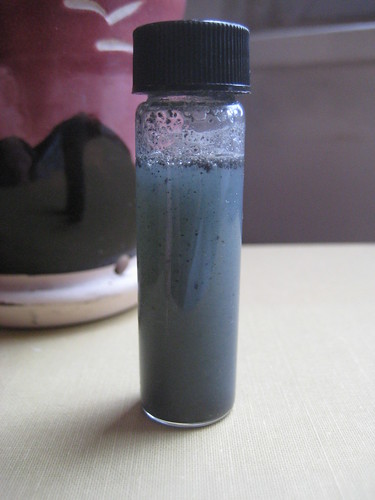
Leave the mixture overnight, allowing the plastic sludge to settle to the bottom of the vial. The liquid above it is still-potent nitric acid, which may be skimmed off with a pipette. Save this in a second bottle for future use, but do not reintroduce it to your bottle of clean acid.
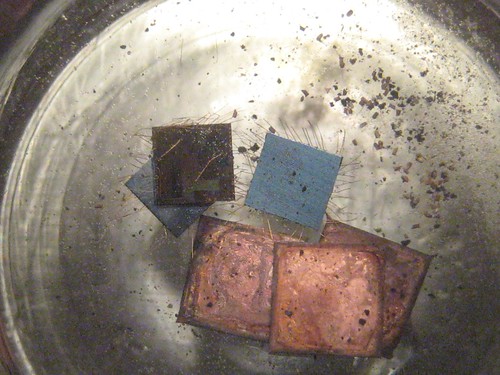
At this point, you've got a vial which contains a lot of plastic gunk and very little liquid. Flush it with water to remove the soluble gunk, then dump the remainder into a shot glass for sorting with tweezers. (Pick the chips up by their bonding wires, as you might scratch the surface.)
Result
Once decapped, each die should be cleaned in acetone. For microscope photography, the bonding wires ought to also be plucked by tweezers.

249 comments:
«Oldest ‹Older 201 – 249 of 249This blog offers fantastic information and has been a great resource for finding relevant details. I’m sharing another link for customized packaging that might be useful for you all—there’s a wide variety of Custom Boxes available!
Autoemporium Caloundra car detailers offer professional and affordable car detailing services to keep your vehicle looking its best. Our team of experienced detailers uses only the highest quality products and equipment to ensure a thorough and sparkling clean. We offer a variety of services, including interior and exterior detailing, paint correction, and ceramic coating. Contact us today to schedule an appointment.
USA Jacket Store offers a variety of jackets that are perfect for those who want to look stylish and stay warm.
Cardi B Blue Long Fur Coat
Car Parking Multiplayer for PC offers a realistic driving simulation that challenges players to master their parking skills in various environments. With stunning graphics and a vast open world, you can explore busy streets and parking lots. The game features multiplayer mode, allowing you to compete with friends and other players. Choose from a wide range of cars and customize your experience. Perfect for driving enthusiasts looking for fun and skill improvement!
This post offers such valuable insights The information is both engaging and informative. For organizations aiming to improve quality, pursuing ISO Certification In Saudi Arabiavisit our website.
This is a fascinating procedure for uncapping microchips! It’s impressive how accessible you’ve made the process, even without a full lab setup. On a different note, for those looking to promote their brand, collaborating with a reliable corporate gift supplier can be a game-changer. Custom Corporate Gifts can really enhance your outreach and leave a lasting impression. Thanks for sharing such detailed instructions!
"Sounds like an incredible trip! Volunteer Opportunities The house you rented sounds absolutely dreamy, especially with all those lemon trees and that stunning view. I’m curious to see how the shoot turns out! Also, those dinner dishes at Spot must have been delicious—pasta, cheese, and truffles are such a winning combination. Enjoy your last day in Palma!"
This is a fascinating, hands-on guide to removing microchip packaging without the need for a full chemical lab setup! It's always impressive to see innovative, practical solutions like this. Similarly, when it comes to finding the perfect gift for your clients or team, working with a reliable corporate gift supplier can help you discover unique and thoughtful options. Whether it's luxury corporate gifts or practical gadgets, the right gifts can make a lasting impression, just like this impressive process!
Pyrite Stone is often known as "Fool's Gold" and is a striking golden-yellow mineral with a metallic luster, resembling real gold. This stone is popular among crystal enthusiasts for its believed properties of protection and prosperity. Known to stimulate the intellect and enhance willpower, pyrite is often used in meditation and manifestation practices. With its unique cube-like structure, pyrite also makes an eye-catching addition to any mineral collection, admired for both its beauty and supposed energetic benefits.
Inspired by the timeless Western charm of the hit TV series Yellowstone, Yellowstone Women's Clothing by America Outfits offers a stylish collection of jackets, vests, shirts, and more. Designed with comfort, durability, and elegance in mind, these pieces perfectly capture the bold spirit of the Dutton Ranch while adding versatility to your wardrobe.
Great insights shared here! This blog is truly a valuable resource for readers. It inspired me to explore more about trendy styles like Yellowstone Clothing, which has become iconic for its blend of fashion and TV nostalgia. Your post encourages creativity, much like Yellowstone Clothes bring character to wardrobes. Keep sharing such amazing content!
This is such a detailed and informative post! Your step-by-step explanation of the cold, lab-less HNO3 decapping procedure is fascinating, and I appreciate how you’ve made a complex topic more accessible. It’s always exciting to see innovative approaches like this being shared with the community. Thank you for taking the time to document and explain this process so thoroughly!
Epicforce Tech
Wow, this is a really interesting and well-written blog!
Heritage Rough Rider Stag Grips: A Detailed Overview
Such an amazing post, I really like it. I also want to tell you about the website which is providing very helpful information about FOSA Order Management .
Nuestros blogs son realmente buenos e interesantes. Es muy bueno e informativo. Es genial ver las carreras. Los barcos van rápido y los accidentes no son infrecuentes. Hay una razón por la que las tripulaciones.qué es un dui en virginia
Nuestros blogs son realmente buenos e interesantes. Es muy bueno e informativo. Es genial ver las carreras. Los barcos van rápido y los accidentes no son infrecuentes. Hay una razón por la que las tripulacionesqué es un dui en virginia
The decapping technique for nitric acid (HNO₃) is part of a laboratory protocol that allows safe handling of chemicals without conventional equipment. To perform this operation in a cold labless setting, wear proper personal protective equipment (PPE), set up the workspace, and ensure adequate ventilation. Avoid using fume hoods or heating elements.These lawyers give their clients crucial advice in high-stakes situations because they have a thorough understanding of both criminal law and delicate legal matters.virginia sex offender registry laws
This isn't the first article by this author. I always find him to be a very talented writer!Men's Cosplay Outerwear
Spenden per PayPal ist eine einfache und sichere Möglichkeit, gemeinnützige Organisationen oder persönliche Anliegen zu unterstützen. Mit nur wenigen Klicks kann man weltweit Geld überweisen. PayPal bietet Transparenz, Käuferschutz und schnelle Transaktionen, was es zu einer beliebten Wahl für Spendenaktionen macht. Ideal für unkomplizierte und schnelle Hilfe!
https://whydonate.com/de/blog/spenden-sammeln-mit-paypal/
I never read this type of article before. I appreciate you for the article you have written. Thanks.<a href="https://www.dchica.in/collections/period-panties-for-all-teens-girls”>Period underwear for girls</a>
Choosing the right Desktop Application Development Services can transform your internal operations and boost overall efficiency. From custom software tailored to your workflow, to robust applications that handle large data processing, desktop apps are ideal for businesses seeking power, speed, and security. With expert developers skilled in frameworks like .NET, Java, and Python, modern development teams create responsive and intuitive interfaces that enhance user experience and drive performance.
If you're looking for Repuestos Xiaomi to keep your devices running smoothly, you're in the right place. Whether it's for Xiaomi smartphones, tablets, or other electronic products, Repuestos Xiaomi ensures that you get high-quality replacement parts that match the performance and durability of your original components. With genuine parts, you can repair your Xiaomi device efficiently, prolong its lifespan, and maintain the top-notch functionality you've come to expect from the brand. When searching for Repuestos Xiaomi, always choose reliable suppliers to ensure the best fit and performance.
The Celebrat A35 Headphones are designed to offer an exceptional audio experience with cutting-edge technology. Whether you're enjoying music, gaming, or taking calls, these headphones provide clear sound, deep bass, and comfortable wear for long periods. With advanced Bluetooth connectivity, the Celebrat A35 Headphones ensure seamless pairing with your devices, giving you the freedom to move without being tethered to wires. If you're looking for headphones that combine style, performance, and comfort, the celebrat a35 headphones are the perfect choice for audiophiles and everyday users alike.
Choosing a mens black shalwar kameez means embracing a versatile wardrobe essential. It pairs well with waistcoats, shawls, or even a simple pair of leather sandals for a complete traditional look. Popular options include black cotton shalwar kameez for men for everyday comfort, or black designer shalwar kameez for festive occasions. Tailored to perfection, these outfits flatter all body types and are available in both slim-fit and regular styles, making them ideal for both young and mature men.
Grace, a name synonymous with premium textile innovation in Pakistan, offers a diverse range of high-quality fabrics tailored to meet the needs of both local and global fashion markets. With a strong commitment to excellence, Grace Fabrics has built a reputation for delivering elegant, durable, and trend-forward materials. Whether you're a fashion designer or a retail buyer, Grace provides fabrics that blend tradition with contemporary style, making it a trusted name in the textile industry.
corner wardrobes are space-saving storage units designed to fit into room corners. They utilize areas often left empty, turning them into practical and elegant storage solutions. Ideal for bedrooms, dressing rooms, and small apartments, they offer smart organization without taking up too much space.
Corner Wardrobes
When it comes to beating the heat in style,mens summer shalwar kameez is the ultimate wardrobe essential. Crafted from lightweight, breathable fabrics like cotton, lawn, and wash & wear, these traditional outfits offer unmatched comfort during hot days. Whether you're heading to Friday prayers, Eid gatherings, or casual family events, a summer shalwar kameez keeps you looking fresh and feeling relaxed, no matter the temperature.
Grace Fabric is a leading Pakistani brand known for its premium unstitched men’s wear, including wash & wear, cotton, and blended fabrics. Renowned for its high-quality texture, elegant colors, and year-round comfort, grace fabric has become a top choice for traditional and modern men’s clothing. Whether it’s for everyday wear, office attire, or festive occasions, Grace delivers fabric that offers both style and durability.
Confused about collagen vs. protein powders? This insightful guide from Glycosmedia breaks down the key differences, benefits, and ideal uses of each supplement. Whether you're focused on muscle gain, joint health, or glowing skin, this article helps you choose the right option for your goals. Read it now and make your supplement strategy smarter!
Craving chocolate, salty snacks, or carbs? Discover what your food cravings are really telling you in this eye-opening HahaJoks article. From nutrient deficiencies to emotional triggers, find out the hidden messages behind your cravings and how to respond to them the healthy way. Decode your body’s signals and take control of your wellness today!
Dingler acquired a 2-out solitary. He wouldn't receive toward rating all over again this inning, however the Tigers experienced unquestionably padded their direct likely into the backside of the inning. We moreover regretably did not attain toward perspective Tommy Kahnle get an at-bat simply because the Tigers experienced washed the DH via positioning Greene inside remaining. As well poor Tyler Holton Jersey. Tyler Owens arrived within just for the backside of the 9th, manufacturing his weighty league debut. He received 2 groundouts prior to offering up a one towards a pinch-hitting Gustavo Campero.
Finding a reliable co working space in Islamabad has always been a challenge, but Thewspace really stands out. The balance between shared work areas and fully furnished private offices makes it suitable for both freelancers and established teams. The environment feels professional yet comfortable, and the community vibe adds to productivity. A co working space in Islamabad with this level of flexibility and modern infrastructure is rare. coworking space in Islamabad
I’ve been researching different options for flexible work environments in Islamabad, and I recently came across The W Space, a modern coworking space in Islamabad that really stands out. They not only provide affordable shared work areas but also fully furnished private offices in Islamabad, which is perfect for small teams and startups. The professional yet comfortable environment makes it easier to stay productive compared to traditional setups. If anyone here is looking for a shared workspace in Islamabad
Fantastic article! Loved the clarity and details in each section. Please check out my site too. Wiznet
Clear, practical, and impressively safe explanation of labless HNO3 decapping. The stepwise reasoning, cautions, and results make complex reverse engineering approachable and reproducible for curious hardware researchers everywhere today thanks. Visit website
Canada Visit Visa Requirements for Pakistani Citizens
visit website
BoxesGen offers eco-friendly hemp-food-packaging
designed to keep food products fresh while supporting sustainable practices. Made from natural, biodegradable hemp materials and fully customizable with logos and designs, this packaging ensures safe storage, product protection, and a clean, natural brand presentation.
Really enjoyed reading this blog. The content is useful and engaging. Please visit my website as well. SilverLake er
A very informative and well-structured blog. Nice effort! Don’t forget to check out my site. spring cypress ER
Very well-written and easy to understand. Great content! Please check out my site too. Aether Health
Fascinating process! For safely storing delicate chips or tools, check out custom packaging boxes.
Really interesting breakdown of the cold, labless HNO3 decapping procedure. The step-by-step explanation makes a complex process much easier to understand, especially for readers exploring alternative approaches. I also appreciate discovering resources like Felon Capital Finder, which can help people find financial opportunities while rebuilding their future.
Cold, label-free (labless) packaging and Custom Boxes are closely related in modern branding, as both focus on Custom Boxes clean, minimal, and flexible packaging solutions that help businesses maintain a professional look while ensuring product safety and customization for different industries.
Post a Comment